Showing posts with label Betsy. Show all posts

Monday, February 23, 2015

Betsy Challenge 19: Something Borrowed, Something Blue

I knew that blue foods would be tricky even when we were planning the challenges last summer. Blue foods just aren't really plentiful. The obvious one - blueberries - didn't become popular in recipes until well after my chosen time period (1840s-1860s). So I decided to stretch myself into a new era, and I even had a book I was interested in using.

Fannie Farmer is a legendary chef in American cookery. Her recipe book, The Boston Cooking-School Book, completely revolutionized the way cookbooks were written. Prior to its publication, most cookbooks relied on cooks' knowledge of arbitrary measurements. We're familiar with these at the Historical Food Fortnightly - "butter the size of an egg", and so forth. Fannie Farmer's cookbook promoted a scientific approach to cooking and standardized these measurements into the ones we know today - cups, teaspoons, and tablespoons. She also relied on volume rather than weight. Whether or not this was an improvement, and what it did to American cooking, is up for debate (and if you're interested on how the post-Fannie Farmer home economics movement changed women's roles and domesticity, I highly recommend you check out Made From Scratch by Jean Zimmerman). However, it means that the recipe does not require any of the fudging or translating that older recipes do!

I also borrowed my mom's kitchen to make this, yet again.

The Challenge: Something Borrowed, Something Blue

The Recipe: Steamed Blueberry Pudding, from The Boston Cooking-School Book

The Date/Year and Region: 1912 (Revised Edition), Boston

How Did You Make It: I rubbed the butter into the dry ingredients with my fingertips (which is a technique I learned while learning to make soda bread - it's similar to using a pastry cutter or running it through a food processor, but ends up with a lighter finish). Then I added the milk and the blueberries dredged in flour, put it in the steamer, and put that in a stock pot with water to steam for an hour and a half. Took it out, got it out of the mold, and ate it - couldn't have been easier! And my small mold was a perfect size.

Time To Complete: About an hour and 45 minutes

Total Cost: Less than $5

How Successful Was It?: It's pretty tasty! I didn't have time to make the sauce that should have gone with it, but we had whipped cream on it and that was a nice addition. With no sugar added to it, it's a little bland on its own. I was a little concerned about the taste with so much baking powder added to it, but it turned out like a big biscuit with juicy blueberries in it. The family taste-tested it and gave it two thumbs up.

How Accurate Is It?: No heirloom ingredients but otherwise I followed the recipe to the letter.

Have some pictures!


Rubbing the butter into the dry ingredients

Blueberries are surely the prettiest fruit...


Put into the mold for steaming...bon voyage, buddy!

The finished product! It got a little stuck to the pan but it tasted lovely!

Saturday, December 13, 2014

Betsy Challenge 14: Fear Factor

It may sound silly, but I'm afraid of gelatins.

Okay, it is silly. I come from the Upper Midwest - the land of Jell-O salads. No family dinner is complete without Jell-O, preferably with fruit in it. Pears go in red or green Jell-O, mandarin oranges in orange Jell-O. It's a ritual here.

So, why should I be afraid of historic gelatins? I'm just afraid of them not setting up. It's a chemical process, and chemical processes scare me in general. But I've learned to be fearless, so I decided to make some sort of jelly.

I had plenty of resources and recipes - calves feet jellies, aspics, wine jellies. You'll be relieved to know that I avoided Eliza Leslie (for once) and went with Eliza Acton's Modern Cookery.

Acton goes on to note that this is technically NOT a blanc-mange, since it's not white. It's in the family of cream jellies, more of a Bavarian cream or "un Fromage Baravoise. Either way, this looked like a winner - it already says it's extremely good!

The Challenge: Fear Factor

The Recipe: Extremely Good Strawberry Blanc-Mange from Eliza Acton's Modern Cookery  (found on Google Books)

The Year/Date and Region: 1868, England

How Did You Make It: As always, I halved the recipe. First, I mascerated the strawberries with some sugar and let them sit to get juicy. After a couple hours I came back and mashed them through a sieve. After struggling to find the right tool for this (potato masher? meat tenderizer? wooden spoon?) I used the bottom of a glass jar. Necessity is the mother of invention, right?


Now, I have to come clean. I semi-cheated. The recipe calls for isinglass, and try as I might, I couldn't find any brewing supply store in the area to buy isinglass. I did not want to mess with carrageenan, which was also used in the 1860s to jellify things. The only other period option I was left with was boiling calves' feet to extract the gelatin, and I didn't think my neighbors in my apartment building would appreciate it. So, I went with powdered unflavored gelatin. Despite the fact that it wasn't available in the 1860s, and wasn't called for in the recipe, it's still similar chemically to the gelatin from calves' feet.

Anyway, where was I? Gelatin. Mixing gelatin with milk makes it look pretty gross.


But, mixing it in with the strawberries was SO pretty.


I poured the mixture into some little copper molds and put them in the fridge to set up overnight. When I woke up in the morning, they were all set! VICTORY! I dipped one in hot water and turned it out onto a plate. So very, very pretty. It was very firm (I may have overdone it with the gelatin in my nervousness).


Time to Complete: Less than half an hour, plus overnight to set and the time the berries spent sitting in sugar.

Total Cost: I didn't really keep good track of this. More than $5, less than $10.

How Successful Was It?: VERY. Imagine strawberries and cream, but in gelatin form. I taste-tested it on two people: my boss, who enjoyed it very much, and the Gentleman Friend, who also enjoyed it greatly. It was...dare I say it? Extremely good. (Sorry, couldn't resist.)

How Accurate Is It?: We've already talked about the gelatin, and the strawberries were not heirloom. I do want to try this again with isinglass, so I can judge the difference.

Saturday, November 15, 2014

Betsy Challenge 12: If They'd Had It

I had no plans for this particular challenge, and I was starting to get a little nervous. That's when I stumbled on this recipe from, you guessed it, Directions for Cookery:

(I swear, I'm giving Miss Leslie a rest after this)

Fruit leather from the 1840s! Make sense - if you have a lot of fruit, dehydrating it is an easy way to preserve it for later. Leathers can even be reconstituted. Fruit leather it is!

 The Challenge: If They Had It

The Recipe: Peach leather from Directions for Cookery by Eliza Leslie

The Date/Year and Region: 1840, United States

How Did You Make It: Fresh peaches are a bit hard to find in Minnesota in November, so I went with apples. I also had to decide how to handle the "leave it in the sun" bit - even if I wanted to risk leaving fruit in the sun (and the potential for attracting winged insects), there isn't enough sunlight to do it at this time of year, and we got hit with a really gigantic snowstorm this past week. I could have used a dehydrator, but that would make it more modern than I'm comfortable with. In the end, I decided to cook it in an oven on the lowest temperature possible (170, in my oven). I pared and chopped the apples, cooked them down with a little bit of water, added some sugar, and macerated the fruit with a potato masher. Spread out on two cookie sheets, it took about 8 hours.

Time To Complete: All flippin' day.

Total Cost: About $5 for the apples.

How Successful Was It?: Part of the center of the sheet of leather didn't get done, but the rest turned out well! Like a big, chewable, apple-flavored Fruit Roll-up

How Accurate Is It?: The apples are not an heirloom variety, and I obviously had to put them in an electric oven.


Saturday, November 1, 2014

Betsy Challenge 11: Foods Named After People

Last weekend I went to my parents' house to spend the weekend with them and celebrate both my birthday and my mom's birthday. While I was there, I thought it would be fun to do a challenge with my mom (hi Mom!). I took over her kitchen on Saturday and made Franklin cakes.

I have no idea what connection these cakes have to Benjamin Franklin, or if there even is a connection, but this has been a recipe I've wanted to try for a while. I have seen it before, and I remember being intimidated by it - probably because of the queen cake pans and converting the amount of eggs. I take it as a sign of good things that I was able to research queen cake pans, decided that muffin tins would suffice, and simply winged it on the eggs. My fear of cooking is abating, thanks to HFF!

The Challenge: Foods Named After People

The Recipe: Franklin Cakes, Directions for Cookery by Eliza Leslie (anyone else tired of me and my love affair with Mrs. Leslie?


The Date/Year and Region: 1840, United States

How Did You Make It?: I followed the directions. Har har. It really wasn't all that complex. The hardest part was using a different oven and discovering that the "warm" setting on my mom's glass-top stove should really be the "do absolutely nothing for butter and molasses" setting. I did not half the recipe as I usually do, but I only used four eggs and one large lemon instead of two. I baked at 350 for about 25 minutes.

Time to Complete: A couple hours, including a "holy heck we need more molasses than that" grocery store run and the aforementioned debacle with the warm setting

Total Cost: I'm the worst at guessing this. There were a lot of spices so I'm going to say it was more than $5 but less than $10?

How Did It Turn Out: They were good! Like little gingerbread cakes. They were quite dense, so one cake was plenty for one person. They got good reviews from the family. I personally would plan to monkey a bit with the seasonings - it was missing a little something. I think there was also either too much or too little lemon in it. For a non-historic treat, they were really good with some cream cheese frosting.

How Accurate Is It?: I did not use queen cake pans and went for modern muffin tins. Next time I would like to try some patty pans. Also modern oven, stove, etc etc

Pictures!
Butter melting in molasses is funky-looking.

The finished product! They were very pretty.

Mr. Toby helped with supervision and begging. He may have gotten a bit of Franklin cake for his efforts.


Saturday, September 20, 2014

Betsy Challenge 8: East India Pickle

I have never really enjoyed the process of making jams or jellies. There were a couple autumns I went to town on my parents' crab apple tree and made crab apple jelly, but that lost its appeal quickly. So I knew I wasn't going to do a traditional fruit preserve for this challenge, and instead decided something I'd never done before - pickling.

I am generally too anxious for canning, so I knew I wanted to try one of those old pickle recipes that you can keep in the fridge and keep adding to, rather than sealing it up and storing it away. I also wanted a pickle recipe that didn't have to sit for weeks on end - I wanted quick results. And, straight vinegar is not my favorite scent, so I didn't want to have to cook a whole bunch of vinegar either. I know, I have a lot of requirements for pickles.

Enter the recipe for East India Pickle from our old pal Eliza Leslie, in her Directions for Cookery. Normally I would put up a screenshot of the recipe, but it's spread out over a few pages, so I'll just direct you to page 227. No cooking of vinegar? Check! Pickles ready within a month? Check! She even says that you can keep adding to the pickle, though I will caution you that I highly doubt her "go ahead and keep it for two years" directive - I'm going to figure on these being similar to refrigerator pickles with a shelf life of about three months.

The Challenge: In a Jam (or Jelly, or Preserve)

The Recipe: East India Pickle, from Directions for Cookery

The Date, Region: 1844, American (Philadelphia); a similar recipe with the same name exists in the White House Cookbook from the 1880s

How Did You Make It: First I created the vinegar pickle well ahead of time. I used white vinegar, mustard seeds, shallots, garlic, turmeric and ginger. I could not find long pepper besides ordering it online, so I used black peppercorns instead. This time I doubled the recipe, put it all into a gallon jug, and let it sit in a sunny place (the best I can get to "a warm place") for ten days.

Next, I processed the vegetables. I cut up a head of cauliflower, three bell peppers, three medium-sized carrots, a handful of pearl onions, a whole bunch of green beans and two small cucumbers. I threw in a handful of green grapes, because I had them on hand and I was intrigued by the idea. I put them in a brine and set them in a fridge for a week. (Do note that I let the vinegar and the veggies sit longer than Mrs. Leslie directs - life got busy.)

I took the vegetables out, drained them, and rinsed them with more vinegar. I divided them up into jars. For someone who has real difficulty with spatial reasoning, I actually had the perfect amout of vegetables to fit twelve pint jars. I then strained the vinegar over the vegetables. I was honestly surprised by how good it smelled - I'm not a huge fan of turmeric, but I smelled the mustard, garlic and ginger more than anything. I put the covers on, and stuck them in the fridge.

Time to Complete: Ten days for it all to sit. Processing the vegetables probably took an hour (thank you, mandolin slicer), prepping the vinegar took half an hour (mostly peeling/slicing shallots, garlic and ginger). Canning took about half an hour.

Total Cost: 'SPEEEENSIVE. I ended up with 12 pints of pickles, but the cost for all the spices and some of the more expensive ingredients like the pearl onions and the shallots, plus the cost of the jars, really added up.

How Successful Was It? TBD! I'm going to let them sit for a while before I taste test, obviously. They look and smell good, so I have high hopes?

How Accurate Is It? As usual, I did not have access to heirloom varieties. I also used white vinegar, because I like it better than cider vinegar, but cider vinegar may be more accurate and it would be worth trying with other kinds of vinegar to see the tastes. As mentioned, I also had issues finding long peppers.

Pictures!

The vinegar...look at all the mustard seed at the bottom!


Draining the veggies after soaking in brine

Veggies, ready to be vinegarized!

The finished product


Friday, September 5, 2014

Betsy - Challenge 7: The Best Thing Since Sliced Bread

I got a little literal, and a little abstract with this one, guys. The first thing that popped into my head with "food revolutions" was Grahamism, so I decided to go with that, and take the "bread" part literally with Graham bread.

Grahamism was a food movement, promoted by Reverend Sylvester Graham (duh) in the early to mid-19th century. Rev. Graham was sort of the Dr. Atkins of his time. He promoted a strict vegetarian diet, healthy habits (including daily bathing and the daily brushing of teeth), and abstinence from alcohol. This, he believed, would cure lust - he also promoted sexual abstinence. I bet he was a lot of fun to be around. If you're dealing with insomnia, you might want to give his A Treatise on Bread, and Bread-Making a try. Despite this, his diet was immensely popular and his ideas influenced many of the leading nutritionists of the 19th century, including the Kellogg brothers.

One of the pillars of the Graham diet was a hearty, dense, whole wheat bread that came to be known as Graham bread. In the 19th century, flour was frequently adulterated with substances like chalk, and contained additives to make the bread appear whiter. Graham bread was made with "unbolted"(coarsely-ground whole wheat) flour, free of additives and adulterations. It should be noted that the healthy properties of such bread was well-known and recognized, especially for those suffering stomachaches - it was often called "dyspeptic bread". Graham didn't invent the bread, or Graham flour, but his promotion of the bread connected his name with it, as noted by Elizabeth Acton in Modern Cookery.

The hey-day of Grahamism was the 1840s and early 1850s. I wanted to make an 1860s recipe, rather than an earlier recipe, so I found this recipe for Graham bread from Practical American Cookery, edited by Elizabeth Hall:

So. "Make in the usual fashion", right?

The Challenge: The Best Thing Since Sliced Bread

The Recipe: Graham Bread, from Practical American Cookery

The Date/Year and Region: 1860, United States

How Did You Make It:  I looked up the recipe for wheat bread in the same volume, which called for four quarts of flour and a pint of yeast, and I knew I was in over my head. This might be a good time to once again note that I am no great chef, and I am even less great of a bread-baker. Working with yeast terrifies me. So I put out a call to the fine folks over in the Facebook group to see what their experience was, while I got to researching. Long story short: yes, their yeast was different from ours - it mostly came from breweries as a byproduct of beer-brewing, and there are some ways to reproduce it. There is much more to say about this, but I'm going to save it for another day (and another post) and just note that I decided that I, my apartment neighbors, and those taste-testing the bread would all just be happier if I saved yeast experiments for another time and place, and went with some active dry yeast.

Also, when is a quart not a quart? When Mrs. Hall says it is a pound. Lesson learned: check out the measurements guide in any 19th century cookbook, or you'll be very sad.

Despite all that, I emerged victorious. Using the aforementioned wheat bread recipe, I figured out the proportion of water and salt to flour. I took the Graham bread recipe and turned it into a ratio: two parts fine flour, two parts unbolted flour, and one part cornmeal. I did two cups of each flour, and one cup of the scalded cornmeal. I added the salt and the molasses, kneaded, let it rise, put in loaf pans, let it rest for an hour, then popped it into a 350 degree oven for about 35 minutes.

Time to Complete: From scalding the cornmeal to finishing the bread, it took about 3 hours, but that was mostly letting the dough rise and then rest. Probably about half an hour to 45 minutes of actual work.

Total Cost: Negligible. All-purpose flour and whole-wheat flour and cornmeal, all of which I had on hand, plus the yeast, salt and a dollop of molasses = basically nothing.

How Successful Was It?: It turned out pretty good! It was tasty - a little bland, but not bad. Scalding the cornmeal really helped, I think - it's definitely dense and chewy, but it doesn't have that gritty cornmeal texture. The Gentleman Friend (once again playing the part of guinea pig) declared it a success. I sent him home with half a loaf.

How Accurate Is It?: Well, there's the aforementioned yeast issue; I'd definitely like to try it again with a more accurately-replicated yeast to see what the difference is. I also made a judgement call on the unbolted flour - some recipe books called it "bran", but many of the recipes for Graham bread suggested sifting the flour first before using it, so I decided to use whole wheat flour. Again, I'd like to try it again and see what the taste difference is.

Have a picture!


Saturday, August 23, 2014

Betsy - Challenge 6: Seasonal Fruits and Vegetables

This is going to be the least sexy, most convoluted challenge I have done.

I knew I wanted to do a recipe I hadn't done before, with seasonal foods that were maybe a bit unexpected. I am still enamored of the Prairie Farmer, and went back to it for a seasonal produce recipe. I found another recipe in Rae Eighmey's compilation for "corn and beans", so I went back and looked for the original recipe, based on her 1849 date.

I found nothing.

Please note that the Prairie Farmer has been digitized all over the place. Still I ran into dead ends everywhere. I'm not sure what happened, if Eighmey misquoted the date or if I just missed something, but the Prairie Farmer had no references that I could find to this dish. I finally found a mention in the Country Gentleman - a similar periodical that freely admitted to stealing from the Prairie Farmer - for "methods of cooking green corn", that alluded to the Eighmey-cited recipe with corn "mixed with butter beans, seasoned with butter, pepper and salt, makes succotash, a capital dish". So, I gave it a go.

Despite the fact that I'm writing and posting this just before the challenge ends, I actually cooked it before this challenge even began, and served it the day it started. So, this is likely the only time I will be early to finish a challenge.

The Challenge: Seasonal Fruits and Vegetables

The Recipe: Composite from The Prairie Kitchen by Rae Katherine Eighmey and "Methods of Cooking Green Corn" from The Country Gentleman

Date/Year and Region: Eighmey gives the date as 1849, The Country Gentleman was printed in 1854. The Prairie Farmer was located in the Midwest, while the Country Gentleman was printed in Albany, New York. Make of all that what you will.

How Did You Make It: It was really simple. I cut up the salt pork and cut the kernels off the corn cobs to reserve in the fridge. I boiled the cobs with the salt pork until the pork was falling apart. (As a side note, I may have trouble getting all sorts of interesting ingredients, but my grocery store carries salt pork in abundance. The joys of country living.)

I took out the cobs, and put in the corn and the lima beans. I cooked them until tender, then took them off the stove. The recipe was not clear as to whether or not the vegetables should be drained, but reading between the lines, it read as a recipe for a salad rather than a soup. So I drained off the water, then added butter, salt and pepper.

Time to Complete: Half an hour or so? I was doing other things while the cobs boiled.

Total Cost: The corn was $2 from a roadside stand, the salt pork was $1.50, the beans were given to me for free and the butter, salt and pepper were negligible. So, about $3.50, and with four cobs of corn and about 4 cups of lima beans, there was plenty of food - enough as a side dish for a table of six, for sure.

How Successful Was It? It was...corn and beans and salt pork with butter. Tasty and fresh, not necessarily innovative, but simple and inexpensive and good. And really, really easy.

How Accurate Is It?: As always, I have no idea if the types of corn and beans I used were around in the period but I highly suspect not. I also clearly had some tenuous recipes to work with, but the reference in the Country Gentleman to succotash is pretty clear so I felt confident that, while I maybe hadn't started from a clearly-documented recipe (IMPORTANT: CHECK ORIGINAL SOURCES), I had ended up with one through my research.


And here's a picture of the dish on our period picnic table...which had, in fact, been rained on. Don't worry, the corn and beans were covered and survived and were still quite delicious.


Monday, August 11, 2014

Betsy: Challenge 5 - Pies!

True confession: I have never made a pie crust.

First, I do not come from a family that eats much pie. Some people eat pies all the time; my childhood was instead filled with cakes and brownies. So, not much impetus to try it. Second, I'm not a huge fan of pies myself. Third, I was always satisfied with the Pillsbury pre-made crusts.

But, I figured for this challenge, I'd better try a homemade crust.

For the challenge, I wanted to try something unique - not your average apple pie or cherry pie. I decided to check out the Prairie Farmer, which was a publication printed from 1841 to 1900. It contains a treasure trove of recipes used by farmer's wives in the Midwest, and since they're dated, it's really easy to find recipes useful to one's place and time - if, that is, one lives on the prairie.

Rae Katherine Eighmey has taken some Prairie Farmer recipes, tested them, and converted them for modern cooking in her book A Prairie Kitchen. This was my first stop, and I found a recipe from March of 1859 for a "cheap pie". It was easy to track down the original recipe on Google Books, which reads thus:

...yup, that would be cheap indeed
Pretty simple, really. So I had to pick a pie crust recipe, and I went with our old friend, Eliza Leslie, who had a really easy recipe for a butter crust:


I halved the crust recipe, as usual, and just followed the directions. It was a little tricky, as I was doing some marathon cooking for an event and my kitchen was a little warm. In the future I think I'd pay more attention to keeping things cool.


The Challenge: Pies!

The Recipe: "Cheap Pie" from The Prairie Farmer, and "Common Pie Crust" from Directions for Cookery

The Date/Year and Region: 1859 in Illinois/1840 United States

How Did You Make It?: Just like it says - the pie filling was full strength molasses, a very small bit of flour and some cinnamon. The crust was just as Eliza Leslie had it, but I halved the recipe. I baked it at 350 for about 25 minutes.

Time To Complete: I really had to wrestle with the dough. With baking, it probably took about an hour or so.

Total Cost: Cheap. Har har. I didn't keep track of the costs as I had everything on hand. The butter and the molasses would have been the big cost factors - it was probably about $5, max.


How Successful Was It?: I brought it to a reenactment for people to try, and the results were pretty positive. I happen to like molasses, so I thought it was great. The filling was a bit runny, and it was a lot of crust and not a lot of filling. I would definitely like to try the crust again, so I can try rolling it out more thinly - I think it got a little thick.

All in all, it was an interesting take on a pie and definitely not our modern idea of "pie". Given the date, and knowing what early springtime is like on the prairie, this must have been appealing to those whose stores of preserves, canned produce, and fresh produce were running a bit low at the end of winter. I can definitely see a Midwestern farmer's wife making this recipe for a midday meal with the family - it would please the kids, and fill up farmhands for very little cost.

How Accurate Is It?: As always, I baked in a modern electrical oven, but the rest is, I think, pretty accurate.


The pie on our picnic table on Saturday

Thursday, July 24, 2014

Betsy: German Puffs, or A Not-So-Miserable Failure

Ladies and Gents, we have our first failure. And I'm utterly delighted by it.

For this challenge, I was very torn about what I wanted to make. I had a big case of the undecideds. Couldn't find a recipe that really stuck with me. Until I stumbled upon German puffs from Directions for Cookery by everybody's favorite busybody, Eliza Leslie.


I found other recipes for German puffs in my other period cookery books on Google books, but Miss Leslie's directions seemed the most promising and had the most information about amounts of ingredients. As I have done with pretty much every challenge so far, I halved the recipe.

Here I should mention that I have never taken a cooking class - not even a home ec course in school. The principles and science of cooking elude me. I gleefully flail my way through baking, learning more from trial and error than I do from reading a recipe. I also happen to have a good friend, Sarah, who is a food scientist and is only a phone call away. She'll feature later in the story.

First things first, I melted the butter into the milk. I used 2% for "rich milk" (and also because that's what I had on hand).


Next, I beat the eggs and mixed them into the milk, alternating with flour. This created a rich, eggy batter. It reminded me of a very thin pancake batter, almost crepe-like but more eggy. The cinnamon and nutmeg looked really pretty swirled in the batter.


Now, I have plenty of teacups, but I didn't want to test whether or not they were oven safe. So I went with some custard cups, figuring that was probably a good approximation.Realizing that I'd never made anything like this before, I sent one lone scout in on his own, at 400 degrees for 20 minutes.

Bon voyage, little buddy!

He never even set up. I didn't even take a picture of him because he was so shameful. This is when the phone call to Sarah occurred. She confirmed my thought of bumping the temperature up to 425. I would have gone straight to 450, but they are so small I was worried about burning. I popped another test cup in, and left him in for 20 minutes.

This was slightly more successful! You can see the top has developed a really pretty, custard-y skin and a lovely color, and puffed up quite nicely. Unfortunately, it was still really goopy. At this point, I started to wonder if there wasn't too much liquid in the mix, and that was prevented from setting.

Now that's more like it!
So then I put all four of the rest of the cups in. These looked even worse coming out of the oven, and fell almost immediately, but were probably the most successful in the end - the ones in the frosted glass cups could be turned out and put on a plate, like Miss Leslie directed, and I even tried a taste of them - yummy, but the texture was kind of funny. Goopy. Very goopy.


Pretty, but...goopy.

The Challenge: "Foreign"Foods 

The Recipe: Eliza Leslie, Directions for Cookery 

The Date/Year and Region: 1840/United States

How Did You Make It: See above

Time to Complete: An hour, but probably less for someone more successful 

Total Cost: Negligible. Probably about $4 and would make at least two dozen with the halved recipe.

How Successful Was It?: "Successful" is so subjective. Was it something I'd serve to someone else? Probably not. It's best I didn't set up a taste-tester. But we learn more from our failures than from our successes, and I learned a lot through this process, and if I had to fall flat on my face with something, this was a relatively inexpensive failure. I'm rather delighted with the whole trial-and-error process! Melissa, Sarah and others can attest to the fact that I was gleeful through the whole thing.
 
I have some theories as to why this didn't set up: it's possible I should have used whole milk instead of 2%, and it's also possible that something wonky happened when I halved the recipe. It's also entirely possible that they should have been baked at 450. However, I think the most likely culprit is that there were too many eggs in the recipe. I used four, and perhaps they were too large and there was too much liquid for them to really set up. I'm definitely entertaining suggestions for what to do next time (because I definitely WILL make it again) so if you're some sort of custard/dumpling genius, please do chime in with your thoughts in the comments. 

How Accurate Is It?: Woefully accurate; except, as always, I use an electric oven and stove.
And don't worry, Gentle Reader: this story has a happy ending. The oven was already heated up, and I had some homemade pizza dough on hand, so I made myself a homemade pizza. And that was quite victorious.

Nom nom nom

Friday, July 11, 2014

Betsy - Challenge Three: This Day in History

For the This Day in History challenge, I decided to make an Irish dish to celebrate the anniversary of the Battle of the Boyne, a pivotal moment in Irish history. I am of Irish descent, and I studied abroad in Ireland in college, so to say this was up my alley is a bit of an understatement. This choice caused a couple issues; Irish history is notoriously sketchy up to the late 18th century, as Irish history relied heavily on the oral tradition, so primary source documentation is hard to find; the Battle of the Boyne occured in 1690, before the Gregorian calendar was adopted, meaning that the "date" it happened is a sketchy concept; and Irish history and culture has been heavily mythologized, making it difficult to separate the fact from the corned-beef-and-cabbage-lace-curtain-Irish fiction.

Long story short, I solved these problems with the following decisions:
  • I utilized recipes and resources from the 19th century, as these were actually documentable; they didn't go back to the original date of the event, but there's no rule that says they have to.
  • I picked July 11th; the original battle occurred on July 1st of the Julian calendar, which corresponds to July 11th in the new style.
  • I went with the most traditional dish I could find, relied basically zero on secondary sources, and trusted my instincts as to what I know about Irish culture.
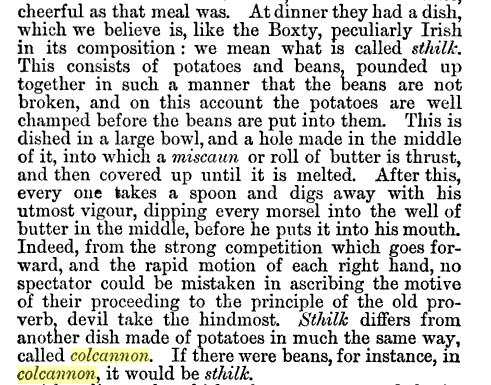
For a dish, I picked colcannon. When I was in Ireland, I ate colcannon several times, but I've never cooked it before. It is a very traditional dish of mashed potatoes and cabbage. Although potatoes were introduced to Ireland before the Battle of the Boyne, they really didn't take off as the staple food we now associate with Irish culture until some years later. But, we've already established I'm working within the 19th century, when potatoes were well-established in Irish foodways.

I checked a couple different recipes and sources for info on colcannon. Here's an excerpt from Tubber Derg, a book of Irish stories published in 1869:


I found similar references to how colcannon was eaten in other sources. Later recipes from the 1870s and 1880s have instructions for colcannon that sound like fancy puddings, involving eggs and breadcrumbs and even cheese crusts.

This recipe, from The Cooks Oracle, dated 1825, seems slightly more traditional, though still baked in a mould. Recipes seem to call for spinach, leeks, or cabbage interchangeably.


Also, really plain. Whatever. It's Irish.


The Challenge: This Day In History


The Recipe: Colcannon (No. 108) from The Cook's Oracle


The Date/Year and Region: 1825/England


How Did You Make It: I did exactly what the recipe said. I boiled potatoes (probably about two pounds?) and half a head of cabbage (shredded) separately. I drained off the cabbage and potatoes, put the cabbage in the same pan as the potatoes, and mashed away. I added half a stick (4 T) of butter, plus salt and pepper to taste (probably about a tsp of each, but I didn't measure). I put the whole thing in a casserole dish, scored the top, and popped it in the oven for 10 minutes.


Time to Complete: Hard to say - the potatoes refused to cook quickly, and I was working on several dishes at once. Maybe half an hour?

Total Cost: The potatoes were about $1, the cabbage was $.32, and the butter was negligible. This made about 5 or 6 servings - super, super economical.


How Successful Was It?:  You'd think mashed potatoes with cabbage would be pretty "meh", right? It was actually quite tasty. The Gentleman Friend who taste-tested declared it very good (then again he's not really at liberty to give his honest opinion, but he insisted it was good). I'm going to say that putting in that much butter will make anything taste good.


How Accurate Is It?: Besides the accommodations/creativity listed at the beginning of this, I'd say I did a damn good job of keeping close to the original recipe. I even resisted the urge to add milk to the thing. 


The finished dish, out of the oven.


With the rest of the meal - spring green salad and beef roast. Sorta Irish?

Saturday, June 28, 2014

Betsy: Peas Soup (Or, Some Like It Hot, Some Like It Cold...)

One of the goals I have had with these challenges is to try and make every-day fare - things that our forebears might have eaten as a matter of course, rather than fancy food meant to impress. I also have a goal of developing a repertoire of simple foods that could be cooked at events.

So, what kind of simple soup to make? I decided pretty early to try a pea soup/porridge. I found the perfect recipe in Eliza Leslie's Directions for Cookery from 1837:


Not so difficult, but interesting enough and has some interesting flavor palettes with the mint. I had to wait until very late in the challenge to make it because, unsurprisingly, it takes for-freaking-ever to make, and I didn't want to have to slave over a stove after work for dinner at midnight, so I needed a free weekend day.


The Challenge: Soups, Sauces and Gravies


The Recipe: Eliza Leslie's Directions for Cookery, found on Google Books


The Date/Year and Region: 1837, United States


How Did You Make It: I started by soaking the dried split peas overnight. I browned the beef - this isn't explicitly stated in the recipe, but I thought I'd do it anyway since that's kind of a staple of soup-making. Then, I basically chucked the peas, beef, bacon and mint together as the recipe stated. I halved everything since I didn't have a stock pot handy and I'm all by my onesies so I don't need five gallons of soup.

Fact: You can't get dried mint at any grocery stores around these parts. Some folks even looked at me like I was really nuts. So, based on a recipe for "green peas soup" in the same volume, I put a sprig of mint in the pot and took it out after 20 minutes of boiling. After three hours at a steady simmer, the peas were getting pretty mushy, so I added in the celery and let it sit for about another hour.

The recipe said to strain it, so I strained some of it into a bowl for taste-testing purposes.


Time to Complete: 4 hours or so


Total Cost: About $14.86. The peas were very cheap, I only used a spring of the mint, and the celery was free. It sounds like a lot for a soup, but I am pretty sure I have a gallon and a half leftover after dinner tonight. Divvying it up into 10 generous portions makes it about $1.50/serving. Not bad.


How Successful Was It?: It wasn't bad. The flavors were really interesting - the celery was very strong, although celery admittedly isn't my favorite vegetable. I may try celery seed next time to see how that goes. The mint is interesting mixed with the celery and the bacon flavors - not bad, just interesting. I definitely prefer it with some meat in it. It's also really, REALLY thick - when it got cold, it was basically sold. Not a bad thing, in my book, but you'll definitely need to thin it out if you plan to reheat (in the pot, nine days old, couldn't resist). It looks really, really pretty though - I was worried the beef/bacon might make it a little gray, and had some spinach on hand in case I wanted to add some juice for green, but it turned out a lovely, muted green.

How Accurate Is It?: Pretty darn accurate, I'd say. I followed the recipe closely, and the only modifications I made were using fresh mint instead of dried, and browning the beef to start. 


To start: all the ingredients in the pot, ready to simmer for hours


After the celery is added - peas starting to achieve complete mushification


The finished product - pretty tasty, in an unconventional way!


Wednesday, June 11, 2014

Betsy: Plum Puffs from Anne of Avonlea

The Challenge: On the Facebook page, I gave a teaser about what I was cooking for the first challenge. It's something from an era I've never interpreted (and, frankly, never want to interpret), and from a book that first inspired my love of history. The book is Anne of Avonlea, the era is the late 19th century, and the recipe is plum puffs!

The Anne series of books made me fall in love with history. I watched the miniseries again and again, and read the books as many times as I could take them out from the library, enamored of the quaint-yet-elegant country life of Anne, Diana and their friends. I wanted to go to a one-room schoolhouse, play on Barry's Pond (excuse me, the Lake of Shining Waters), and wear a dress with puffed sleeves. Anne, the awkward and "homely" heroine who gets herself into so many scrapes with so many good intentions, also appealed to little me, and still has through all these years. So, when we set out a literary challenge, I knew for sure that I was going to pick an Anne recipe.

The plum puffs came from Anne of Avonlea. In the book, Anne has become a teacher with many ideas about what a teacher should do - including never hitting a child. Unfortunately, she meets her Waterloo in Anthony Pye, and gives him a whipping. Horrified with herself, she goes home for a good cry, which is how Marilla finds her.
"I can't help it. I want everybody to love me and it hurts me so when anybody doesn't. And Anthony never will now. Oh, I just made an idiot of myself today, Marilla. I'll tell you the whole story."
Marilla listened to the whole story, and if she smiled at certain parts of it Anne never knew. When the tale was ended she said briskly, "Well, never mind. This day's done and there's a new one coming tomorrow, with no mistakes in it yet, as you used to say yourself. Just come downstairs and have your supper. You'll see if a good cup of tea and those plum puffs I made today won't hearten you up."
"Plum puffs won't minister to a mind diseased," said Anne disconsolately; but Marilla thought it a good sign that she had recovered sufficiently to adapt a quotation.
Oh Anne. How can you not love her?  Who hasn't been there?

The Recipe:  As chance would have it, I came across a recipe for "Puffs" in The Good Housekeeper by Sarah Josepha Hale from 1841. Here's what she says:

Roll out puff paste nearly a quarter of an inch thick and, with a small saucer, or tin cutter of that size, cut it into round pieces; place upon one side raspberry or strawberry jam, or any other sort of preserved fruit, or stewed apples; wet the edges, fold over the other side, and press it round with the finger and thumb.
Simple concept! Puff pastry with fruit filling. There's even a recipe for puff pastry in the book, and it looked remarkably similar to modern puff pastry recipes. To be sure, I double-checked in The White House Cookbook, and their recipe is very similar as well.

The Date/Year and Region: There are several different theories out there about the timeline of the Anne stories. Most place the Anne of Avonlea scenes somewhere in the 1880s/1890s. So I stuck with that as a general era. Given Marilla's old-school-housekeeper personality, I felt comfortable reaching farther back to the mid-19th century for a recipe that she might have learned as a young woman, or even as a child from her own mother. The Good Housekeeper dates to 1841. The White House Cookbook dates to 1887. Both cookbooks are American.

How Did You Make It: I won't bore you with the details of making the puff pastry, except to note that it wasn't as hard as I feared. Following explicit directions was important, and chilling the dough between turns was very helpful. Since Anne wakes up the next day to a blanket of snow on the ground, I felt confident that Marilla probably chilled the dough on the porch as well.

For the filling, I decided to stew some fresh plums. I got some really ripe, juicy plums, peeled them, stoned them, and put them in a pan with a bit of water and some sugar, intending to thicken it up. I waited. And waited. And waited some more. I put some corn starch in and boiled it. And waited. And still it was runny. But, the plum pieces themselves, though nearly decimated from the process, were sweet and tart and juicy. So, I salvaged what I could.

I followed the recipe's directions: cut out circles, put a blob of filling in them, wetted the corners and folded them over. But, the filling was so runny, it was hard to get them to behave. So, they ended up a little more open that I would have liked - I was hoping for something that looked like a little fruit pie.

It doesn't matter though, because they were DELICIOUS. I baked them at 400 degrees for 10 minutes - that wasn't long enough, so I gave them another five minutes, at which point the bottoms were golden brown. The dough turned out flaky and light (a little salty, because I used salted butter without realizing, but oh well). The filling was everything a good fruit filling should be (except that it was runny). They got a little soft in between baking and serving (it was a warm, humid weekend) but they were still very good.

Time to Complete: FOREVER. At least that's what it seemed like. The dough took the longest because of the amount of chilling required between turns. In between each turn of the dough I worked on the filling, so it really took about three or four hours. Easily doable of an evening or on a weekend afternoon, but make sure you don't have to go anywhere suddenly, and plan on doing housework in between turns. You know that's what Marilla did.

Total Cost: Negligible. The pastry was flour and water to make a paste dough, plus a half a pound of butter. The plums were under $5. Mrs. Lynde would be proud of my frugality.

How Successful Was It?: They disappeared at the picnic to which I brought them, those who ate them gave rave reviews (even when asked "But seriously...") and those who did not get to try one were disappointed.

How Accurate Is It?: I live in the wasteland known as Central Minnesota. There are no green grocers or fruit markets, and plums are not easily grown here. So, I made do with what was available at my local supermarket, and have no idea if they are at all similar to 19th century plums. I also used my Kitchenaid mixer with the dough hook attachment to mix the dough, but did end up working it by hand at the end to get it uniform.

 Pictures! As stated on my own blog, you will always get terrible pictures from me. Still not sorry.

The finished product, with tea (naturally)
Bottom right, mid-devouring, on the picnic table. Courtesy of my dear friend Karen!


A note: Just before I started working on this, I was sent a link to another blogger who has done plum puffs from Anne of Avonlea. I was unaware of her efforts before I began this process. I still haven't even looked at her post, or her results, for fear of skewing my own research and results. I'm looking forward to comparing our notes, now that I'm done!