Thursday, September 11, 2014

Melissa: Challenge 7: The Best Thing since Sliced Bread

Here I am, the prodigal admin, returning to the blog after skipping a challenge! I apologize for the tardiness of this challenge, but I had to move in to school and start the new semester so the pear dish I was going to make sadly got pushed aside to do, well, school.  But I'm here! Better late than never, right?

To preface this, I am not a salad eater.  I have never been a salad eater.  I am morally opposed to what most people deem "salad", which is basically layers of fat and oil and cheese with some green stuff to make you feel good about yourself.  So I decided for this challenge I would go back to the start of this terrible thing called salad, the 1920's.  I turned to my original cookbook, Woman's Institute Library of Cookery, 1925, for some background.  The book touts that, "there is no more effective nor appetizing way in which to include [fresh fruits and vegetables] in a meal than in the serving of salads.  In addition, salads make a strong appeal to the appetite and at the same time are beneficial so far as the health of the family is concerned."  Yeah, no.  The "salad" I made was definitely not at the top of the healthy totem pole.

What did I make, you ask?

Banana-and-Peanut Salad
with
Fruit-Salad Dressing

Yes. You heard me correctly.  It was insane.

I started off by making the dressing in a double boiler.  It consisted of 1/2 cup pineapple, peach, or pear juice (I chose pineapple), 1/2 cup orange juice, 1/4 cup lemon juice, 1/4 cup sugar, and 2 eggs.  It was briefly whisked together, then put in the double boiler, boiled until it thickened, taken off the flame and whisked a bit, then left to cool before serving.

What do you do when you don't have a double boiler? This!

As that cooled I prepared the "salad".  The recipe calls for cutting the bananas in half lengthwise, rolling them in crushed peanuts, and serving on a lettuce leaf.  If you'd rather have a more appetizing (disgusting) presentation, you could coat the bananas in the dressing before putting the peanuts on.  No thanks!


I ground the peanuts in a vintage nut grinder, as one does, and then put them on a plate.  The peanuts stuck very well to the middle of the banana but fell off of the outside.  Oh well.


See? It's a salad now because it's served on a lettuce leaf!


After the dressing had cooled, I topped my banana with it and tried this weird concoction.  It's... strange.  There are no bad flavors, the combination is just so strange!  I imagined some kind of bananas-and-peanut butter flavor, but the peanuts kind of faded to the background and all I could taste was bland banana and super citrusy dressing.  But I ate salad!

The Challenge: #7: The Best Thing since Sliced Bread


The Recipe: Woman's Institute Library of Cookery (personal collection)


The Date/Year and Region: Pennsylvania, 1925


How Did You Make It: See above :)


Time to Complete: About 30-45 minutes, the dressing took most of the time


Total Cost: I had to buy large bottles of juice for this project, so I would say about $10 outright, but only $3 was used.


How Successful Was It?: Strange... weird... different... unexpected... My father apparently liked it, since he ate two pieces, while my mother and I (more discerning critics) only ate one each.

How Accurate Is It?: Pretty darn! Most of the items I used would have been available in '25, except the bananas might have been smaller.

Friday, September 5, 2014

Betsy - Challenge 7: The Best Thing Since Sliced Bread

I got a little literal, and a little abstract with this one, guys. The first thing that popped into my head with "food revolutions" was Grahamism, so I decided to go with that, and take the "bread" part literally with Graham bread.

Grahamism was a food movement, promoted by Reverend Sylvester Graham (duh) in the early to mid-19th century. Rev. Graham was sort of the Dr. Atkins of his time. He promoted a strict vegetarian diet, healthy habits (including daily bathing and the daily brushing of teeth), and abstinence from alcohol. This, he believed, would cure lust - he also promoted sexual abstinence. I bet he was a lot of fun to be around. If you're dealing with insomnia, you might want to give his A Treatise on Bread, and Bread-Making a try. Despite this, his diet was immensely popular and his ideas influenced many of the leading nutritionists of the 19th century, including the Kellogg brothers.

One of the pillars of the Graham diet was a hearty, dense, whole wheat bread that came to be known as Graham bread. In the 19th century, flour was frequently adulterated with substances like chalk, and contained additives to make the bread appear whiter. Graham bread was made with "unbolted"(coarsely-ground whole wheat) flour, free of additives and adulterations. It should be noted that the healthy properties of such bread was well-known and recognized, especially for those suffering stomachaches - it was often called "dyspeptic bread". Graham didn't invent the bread, or Graham flour, but his promotion of the bread connected his name with it, as noted by Elizabeth Acton in Modern Cookery.

The hey-day of Grahamism was the 1840s and early 1850s. I wanted to make an 1860s recipe, rather than an earlier recipe, so I found this recipe for Graham bread from Practical American Cookery, edited by Elizabeth Hall:

So. "Make in the usual fashion", right?

The Challenge: The Best Thing Since Sliced Bread

The Recipe: Graham Bread, from Practical American Cookery

The Date/Year and Region: 1860, United States

How Did You Make It:  I looked up the recipe for wheat bread in the same volume, which called for four quarts of flour and a pint of yeast, and I knew I was in over my head. This might be a good time to once again note that I am no great chef, and I am even less great of a bread-baker. Working with yeast terrifies me. So I put out a call to the fine folks over in the Facebook group to see what their experience was, while I got to researching. Long story short: yes, their yeast was different from ours - it mostly came from breweries as a byproduct of beer-brewing, and there are some ways to reproduce it. There is much more to say about this, but I'm going to save it for another day (and another post) and just note that I decided that I, my apartment neighbors, and those taste-testing the bread would all just be happier if I saved yeast experiments for another time and place, and went with some active dry yeast.

Also, when is a quart not a quart? When Mrs. Hall says it is a pound. Lesson learned: check out the measurements guide in any 19th century cookbook, or you'll be very sad.

Despite all that, I emerged victorious. Using the aforementioned wheat bread recipe, I figured out the proportion of water and salt to flour. I took the Graham bread recipe and turned it into a ratio: two parts fine flour, two parts unbolted flour, and one part cornmeal. I did two cups of each flour, and one cup of the scalded cornmeal. I added the salt and the molasses, kneaded, let it rise, put in loaf pans, let it rest for an hour, then popped it into a 350 degree oven for about 35 minutes.

Time to Complete: From scalding the cornmeal to finishing the bread, it took about 3 hours, but that was mostly letting the dough rise and then rest. Probably about half an hour to 45 minutes of actual work.

Total Cost: Negligible. All-purpose flour and whole-wheat flour and cornmeal, all of which I had on hand, plus the yeast, salt and a dollop of molasses = basically nothing.

How Successful Was It?: It turned out pretty good! It was tasty - a little bland, but not bad. Scalding the cornmeal really helped, I think - it's definitely dense and chewy, but it doesn't have that gritty cornmeal texture. The Gentleman Friend (once again playing the part of guinea pig) declared it a success. I sent him home with half a loaf.

How Accurate Is It?: Well, there's the aforementioned yeast issue; I'd definitely like to try it again with a more accurately-replicated yeast to see what the difference is. I also made a judgement call on the unbolted flour - some recipe books called it "bran", but many of the recipes for Graham bread suggested sifting the flour first before using it, so I decided to use whole wheat flour. Again, I'd like to try it again and see what the taste difference is.

Have a picture!


Tuesday, August 26, 2014

Wrapping Up Challenge 5 and 6

Sometimes life gets busy. Sometimes moderators don't get to do things in a timely manner (even if they are Benevolent High Overlords). But that doesn't mean we're going to let some really awesome work go unnoticed! So we're smooshing challeges 5 and 6 together for a dual wrap-up!

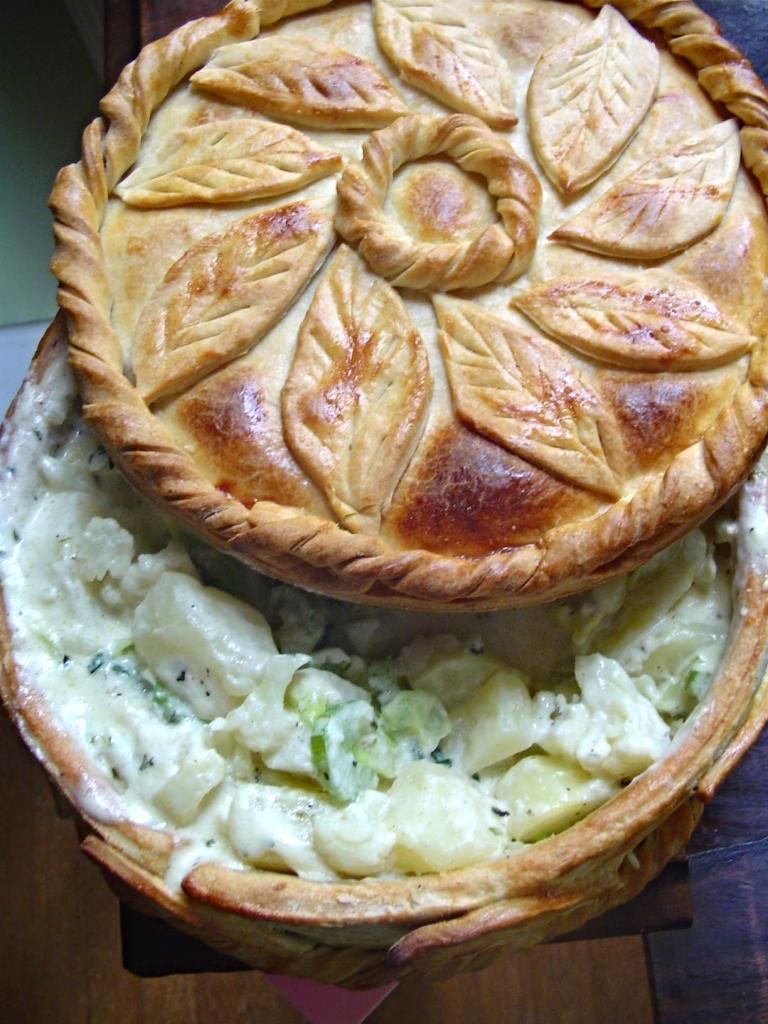
First up - I think we all know who takes the cake on pies. And that's saying a lot, because there were some pretty amazing pies being posted. But Jenni of Living With Jane made not one, not two, but THREE PIES. She basically made a whole meal out of pies. And that standing pie - holy cow. Well done, Jenni!

Good job, and stop making the rest of us look bad.


The seasonal fruits and vegetables challenge turned out to be very thought-provoking. There were some excellent discussions over in the Facebook group about the differences between modern produce and heritage produce, as well as the best options for sugar/sweeteners. If you're not a member of the group, you should join and get in on these conversations!

For a seasonal dish, Joyce of A Taste of History made braised eggplant. It's a really interesting and meticulously researched and documented dish! Well done, Joyce!


I also highly recommend you go check out the very detailed post from The 19th Century Foodie for some really interesting and enlightening information about warm-weather beverages!


Next Up: The Best Thing Since Sliced Bread! Research and reproduce food improvements and innovations in the past. I can't wait to see what you all come up with! Happy cooking!

Saturday, August 23, 2014

Betsy - Challenge 6: Seasonal Fruits and Vegetables

This is going to be the least sexy, most convoluted challenge I have done.

I knew I wanted to do a recipe I hadn't done before, with seasonal foods that were maybe a bit unexpected. I am still enamored of the Prairie Farmer, and went back to it for a seasonal produce recipe. I found another recipe in Rae Eighmey's compilation for "corn and beans", so I went back and looked for the original recipe, based on her 1849 date.

I found nothing.

Please note that the Prairie Farmer has been digitized all over the place. Still I ran into dead ends everywhere. I'm not sure what happened, if Eighmey misquoted the date or if I just missed something, but the Prairie Farmer had no references that I could find to this dish. I finally found a mention in the Country Gentleman - a similar periodical that freely admitted to stealing from the Prairie Farmer - for "methods of cooking green corn", that alluded to the Eighmey-cited recipe with corn "mixed with butter beans, seasoned with butter, pepper and salt, makes succotash, a capital dish". So, I gave it a go.

Despite the fact that I'm writing and posting this just before the challenge ends, I actually cooked it before this challenge even began, and served it the day it started. So, this is likely the only time I will be early to finish a challenge.

The Challenge: Seasonal Fruits and Vegetables

The Recipe: Composite from The Prairie Kitchen by Rae Katherine Eighmey and "Methods of Cooking Green Corn" from The Country Gentleman

Date/Year and Region: Eighmey gives the date as 1849, The Country Gentleman was printed in 1854. The Prairie Farmer was located in the Midwest, while the Country Gentleman was printed in Albany, New York. Make of all that what you will.

How Did You Make It: It was really simple. I cut up the salt pork and cut the kernels off the corn cobs to reserve in the fridge. I boiled the cobs with the salt pork until the pork was falling apart. (As a side note, I may have trouble getting all sorts of interesting ingredients, but my grocery store carries salt pork in abundance. The joys of country living.)

I took out the cobs, and put in the corn and the lima beans. I cooked them until tender, then took them off the stove. The recipe was not clear as to whether or not the vegetables should be drained, but reading between the lines, it read as a recipe for a salad rather than a soup. So I drained off the water, then added butter, salt and pepper.

Time to Complete: Half an hour or so? I was doing other things while the cobs boiled.

Total Cost: The corn was $2 from a roadside stand, the salt pork was $1.50, the beans were given to me for free and the butter, salt and pepper were negligible. So, about $3.50, and with four cobs of corn and about 4 cups of lima beans, there was plenty of food - enough as a side dish for a table of six, for sure.

How Successful Was It? It was...corn and beans and salt pork with butter. Tasty and fresh, not necessarily innovative, but simple and inexpensive and good. And really, really easy.

How Accurate Is It?: As always, I have no idea if the types of corn and beans I used were around in the period but I highly suspect not. I also clearly had some tenuous recipes to work with, but the reference in the Country Gentleman to succotash is pretty clear so I felt confident that, while I maybe hadn't started from a clearly-documented recipe (IMPORTANT: CHECK ORIGINAL SOURCES), I had ended up with one through my research.


And here's a picture of the dish on our period picnic table...which had, in fact, been rained on. Don't worry, the corn and beans were covered and survived and were still quite delicious.


Monday, August 11, 2014

Betsy: Challenge 5 - Pies!

True confession: I have never made a pie crust.

First, I do not come from a family that eats much pie. Some people eat pies all the time; my childhood was instead filled with cakes and brownies. So, not much impetus to try it. Second, I'm not a huge fan of pies myself. Third, I was always satisfied with the Pillsbury pre-made crusts.

But, I figured for this challenge, I'd better try a homemade crust.

For the challenge, I wanted to try something unique - not your average apple pie or cherry pie. I decided to check out the Prairie Farmer, which was a publication printed from 1841 to 1900. It contains a treasure trove of recipes used by farmer's wives in the Midwest, and since they're dated, it's really easy to find recipes useful to one's place and time - if, that is, one lives on the prairie.

Rae Katherine Eighmey has taken some Prairie Farmer recipes, tested them, and converted them for modern cooking in her book A Prairie Kitchen. This was my first stop, and I found a recipe from March of 1859 for a "cheap pie". It was easy to track down the original recipe on Google Books, which reads thus:

...yup, that would be cheap indeed
Pretty simple, really. So I had to pick a pie crust recipe, and I went with our old friend, Eliza Leslie, who had a really easy recipe for a butter crust:


I halved the crust recipe, as usual, and just followed the directions. It was a little tricky, as I was doing some marathon cooking for an event and my kitchen was a little warm. In the future I think I'd pay more attention to keeping things cool.


The Challenge: Pies!

The Recipe: "Cheap Pie" from The Prairie Farmer, and "Common Pie Crust" from Directions for Cookery

The Date/Year and Region: 1859 in Illinois/1840 United States

How Did You Make It?: Just like it says - the pie filling was full strength molasses, a very small bit of flour and some cinnamon. The crust was just as Eliza Leslie had it, but I halved the recipe. I baked it at 350 for about 25 minutes.

Time To Complete: I really had to wrestle with the dough. With baking, it probably took about an hour or so.

Total Cost: Cheap. Har har. I didn't keep track of the costs as I had everything on hand. The butter and the molasses would have been the big cost factors - it was probably about $5, max.


How Successful Was It?: I brought it to a reenactment for people to try, and the results were pretty positive. I happen to like molasses, so I thought it was great. The filling was a bit runny, and it was a lot of crust and not a lot of filling. I would definitely like to try the crust again, so I can try rolling it out more thinly - I think it got a little thick.

All in all, it was an interesting take on a pie and definitely not our modern idea of "pie". Given the date, and knowing what early springtime is like on the prairie, this must have been appealing to those whose stores of preserves, canned produce, and fresh produce were running a bit low at the end of winter. I can definitely see a Midwestern farmer's wife making this recipe for a midday meal with the family - it would please the kids, and fill up farmhands for very little cost.

How Accurate Is It?: As always, I baked in a modern electrical oven, but the rest is, I think, pretty accurate.


The pie on our picnic table on Saturday

Sunday, August 10, 2014

Melissa: A half-hearted Challenge 4 and a quadruple-hearted Challenge 5!

Hey everyone!  Long time, no post, it feels!  I definitely slacked off for Challenge #4: "Foreign Foods" and made a very sad, very boring "chocolate soup" that I accidentally cooked an egg in.  I won't bore you with the stories of my pain and agony caused by that "chocolate soup", but I will leave you with this picture (if you look closely, you can see the little bits of egg yolk floating at the top! Yuck!)


So, in order to compensate for my gross failure at Challenge #4, I decided to participate in Challenge #5... four times.
Yes, four.  Not because I was trying to up Jenni Cole Miller and her three awesome pies, but because the occasion actually arose to bake four whole pies.

First, I decided to make a buttered apple pie from Amelia Simmons' 1790's cookbook, "American Cookery", because there is an orchard right by my house with the most delightful apples and nothing is better than a hot apple pie.  The recipe goes like this:
A buttered apple Pie.
Pare, quarter and core tart apples, lay in paste No. 3, cover with the same; bake half an hour, when drawn, gently raise the top crust, add sugar, butter, cinnamon, mace, wine or rose-water q: s:

Instead of using Simmons' crust recipe I just made up some of Hannah Glasse's Puff Paste, which is my go-to pie crust recipe because pie crust is just one of those things that needs to be constant and strong in your life.


I really liked this recipe because it called for adding all of the extras after the initial baking, which made a delightful buttery soupy pie that didn't have mushy apples.  I would definitely recommend it!  Instead of using white wine, we used my friend's homemade hard cider, which was amazing.  It was apple on apple deliciousness.


After putting the crust on, I posed for a picture.  I love my pies :)


After taking the top crust off and filling the pie.  This little number went back in the oven for about ten minutes so everything would melt together into epic deliciousness.

My friends and I then decided that we would take a trip to the local historic village and park to have a picnic all dressed out, which definitely required food.  I began with the intention to make a meat pie, since I had promised I'd make one for my beau for this challenge, but I didn't plan on the other two, they just sort of... happened.  My dear friend Amy is a vegetarian and I wanted to make her an original dish that was originally vegetarian instead of making something with tofu or eggplant instead of meat.  So, back to Hannah Glasse I went.  I found two of her recipes, one for a beef steak pie and one for an onion pye.  Perfect!  Two pies for the challenge, one of which was perfectly vegetarian.


I made the beef steak pie to the recipe except I used stew cuts of beef instead of hunks of steak (for ease of eating) and used beef broth instead of water.  The onion pye was made almost exactly to the recipe (even down to the point of grating my own nutmeg) with the omission of eggs, because I'm not a fan of those :)  All in all it took one medium onion, two Idaho potatoes, and four small apples to make that pie.

But wait!  What were we to eat for dessert?  I had my eye on this recipe for a long time, and was just waiting for an opportunity to make it... Frederick Nutt's Chocolate Tart!


Now I know that the challenge technically said pies, but our modern term for pie does not necessarily mean that there is a top and a bottom crust, so I just went with it.  I followed the recipe completely!  If I was to make it again I would use some sugar and cream of tartar in the meringue to make it more appetizing.  It looked like browned snow on the top of the tart, and since it's mostly for looks anyway, it's probably best to actually make it look good.

All of the pies were served at our historic picnic today, and a get-together with good friends and good food can never go wrong.  All of the pies got top marks!  I'm so proud of my creations.  PIE!!


The Challenge: #5 Pie!

The Recipe: Two from Hannah Glasse's "The Art of Cookery", one from Frederick Nutt's "The Imperial and Royal Cook", and one from Amelia Simmons' "American Cookery"

The Date/Year and Region: Late 18th-early 19th century America

How Did You Make It: Lots and lots of work!

Time to Complete: I would say that each pie took about 2 hours, start to finish.  I made the first pie all in one fell swoop, but for the last three I made the crust the night before and kept it in the fridge so that I didn't go crazy with making insane amounts of crusts and pie at the same time.

Total Cost:  Oh dear, there is no way of knowing.  The first pie might have cost around $10 for all of the ingredients?  For the last three I went to a giant international market called Jungle Jim's (if you are anywhere close to Southwest Ohio, and you are a foodie, seriously go there.  You will thank me later) where I picked up various ingredients for various projects and then stopped by the apple orchard again to get produce for the pies there... I would say each pie probably cost around $10, but who really knows?

How Successful Was It?: All of the pies ended up tasting great!  The apple pie was delightful, I definitely think I will make that recipe again.  The onion pie was extremely oniony!  The onion seeped into the apples and potatoes and really you couldn't taste anything else.  I loved the seasoning, though.  I think I might use that to season the beef steak pie when I make that again.  It also should have baked longer at a lower temperature because I think that was definitely one of those pies where everything should be a little mushy.  The beef steak pie was very simple but excellent, and my beau was so happy to have finally received his promised meat pie!  I think I might season it with something more than pepper and salt next time.  And the chocolate tart, despite the lumpy meringue, was absolutely delicious!  The filling was nice and custardy and chocolatey.  It was the perfect end to a perfect meal.

How Accurate Is It?: With all of my modifications to the original recipes, I think I kept in the spirit of the past.  The things I changed were minor or necessary changes due to what was available to me and my personal tastes.  I don't think I would have liked the dishes as much without my modifications.  I'd rate them pretty high on the accuracy scale, if I do say so myself!

So, there they are, my four dear pies.  All delicious and lovely in their own right!  I can't wait to see what everyone creates for our next challenge!  Happy eating and happy cooking, dear friends!

Sunday, August 3, 2014

Challenge 4 and Challenge 5

This post is a little tardy! I was out of town for a week and off the grid, and real life conspired to keep me from writing up a summary of Challenge 4 before I made it out on the road. But, I'm making up for lost time now!

The "Foreign Foods" concept was one of those challenges that was purposefully left vague. The idea of "foreign" is a broad topic, and I was interested to see how everyone interpreted it. I was not disappointed! As always, our participants came up with an interesting mix of interpretations from different eras!

First mention goes to Keturah of Land of Our Sojourn. Full disclosure: Keturah is a very good friend of mine who was my reenacting "Big Sister" when I first started as a teenager (and still is!). She and her adorable family are currently on a sabbatical in Peru - if you've ever tried cooking in a foreign country, you know how difficult it can be, and then add in cooking historic recipes. Serious commitment happening in Peru Right now. For Keturah, "foreign" could mean quite a few different things! Since she's out of the country she went with the American classic Indian pudding. Well done, Keturah!


Next up, Hana of Marmota's Dress Diary made a "Moor of Venice" cake from a Bohemian cookbook. I love a good poppy seed/lemon cake, and this one looks extra delicious. She gets a huge amount of respect for just how long she stirred it. Honestly, Hana, I hope your next challenge involves no mixing or beating whatsoever. Way to go!


Next Up: Pies!

Need we say more? It's pies. Who doesn't love pie? Make a pie. Eat said pie. Post your results. Enjoy!